The Key to a Long-Lasting Kayak: Kayak Wax 2026
All paddlers aspire to own a kayak that can withstand years of usage without any visible damage, but let's face it, it's not always possible. Even the most durable kayak will eventually display a few scratches with constant use over time.
However, there might be a simple solution to ensure your kayak looks good and lasts long: kayak wax. In this guide, I will demonstrate how to wax your kayak effectively to maintain and safeguard its cleanliness.
Is Cleaning Your Kayak a Must?
Although protecting your kayak's hull with marine-grade wax and UV protectant spray is essential, cleaning your kayak is equally important. Neglecting to wash your kayak with mild soap and water as needed, or at the very least, rinsing it after each use, can compromise the effectiveness of protective measures. In other words, don't skip the "clean" part of the "clean and protect" process.
Getting rid of dirt and grime is crucial in extending the lifespan of your kayak and keeping it in optimal condition. Dry thoroughly before storing it, as mold and mildew can grow on the hull or inside the cockpit. Additionally, kayaking in salt water may require more frequent cleaning with a mild soap and water solution.
Whether you do a quick rinse or a full-on cleaning, it doesn't take much effort to make a noticeable difference in your boat's appearance. Plus, there's nothing like the feeling of taking a well-kept, clean kayak out on the water. We provide a guide on how to clean your kayak below.
The Crucial Advantages of Waxing a Kayak, Particularly a Composite Kayak
As mentioned, using kayak wax on a composite kayak is highly recommended. But why is waxing a kayak so crucial?
One of the most apparent advantages is that it provides extra protection to the kayak's hull. However, the benefits of waxing a composite kayak go beyond just surface-level protection. Here are at least four reasons why you should consider waxing your kayak during maintenance:
- Enhancing the durability and longevity of the composite hull.
- Shielding the kayak from harmful UV rays.
- Acting as a protectant against dents and scratches.
- Enhancing the shine and color of the composite hull, particularly for painted kayaks.
Another essential benefit of waxing is the possibility of increasing the kayak's speed.
You've likely heard of the performance-enhancing benefits of kayak waxing. The theory is that regular waxing maintains a smooth hull surface, allowing the kayak to move more efficiently through the water and potentially increasing its speed.
While this isn't entirely a myth, the reality is that any speed increase resulting from waxing will be minimal at best. Kayak waxing primarily serves as a protective measure for the hull rather than a performance enhancer. To improve your speed, you must focus on refining your paddling technique.
Necessary Items for Cleaning and Waxing Your Kayak.
So, there you have it. Using kayak wax has its benefits, mainly when applied to composite vessels. I hope our discussion has convinced you to include waxing in your seasonal kayak maintenance and "clean and protect" routine.
Now, it's time to gather all the necessary supplies, prepare for the task at hand, and get started. Here is a list of items you'll need to wax your kayak:
- Two microfiber cloths
- A sponge
- A bucket
- A water hose (garden hose) and a source of fresh water
- All-purpose mild soap or boat wash (kayak cleaner)
- Marine wax (ensure that it's suitable for use on composite kayaks)
- UV protectant (the 303 Products Aerospace Protectant is an excellent option that acts like sunscreen for your kayak)
If your kayak's hull is made of plastic, you may not need marine wax, as polyethylene and resin don't mix well. However, a UV protectant spray is still a must-have. UV rays can damage your kayak's hull, causing color fading and degradation over time. Adding a layer of UV resistance can help protect your kayak's shine and prevent slow but steady hull degradation from repeated sun exposure.
Regarding composite kayaks, using marine-grade wax followed by a layer of UV protectant spray is highly recommended for maximum protection. However, cleaning your kayak is a critical part of the maintenance routine that remains the same regardless of the hull's construction.
While a quick rinse with clean water is sufficient for daily use, it's essential to thoroughly clean your kayak a few times a year, especially when preparing for long-term storage. Proper cleaning is critical to long-term kayak protection.
Now that we've covered the basics, are you ready to learn how to wax your kayak? Let's get started!
A Step-by-Step Guide on How to Wax Your Kayak
Here's a step-by-step guide on how to wax a kayak.
- Step #1: Rinse Your Kayak Use a garden hose with an orange adapter to rinse off any dirt and grime buildup on your kayak's hull.
- Step #2: Prepare The Soap & Bucket. Fill a bucket with clean water and add an all-purpose mild soap or boat wash.
- Step #3: Wash Your Kayak Use a sponge to wash your kayak thoroughly with the soap and water mix, making sure to clean both sides and all the nooks and crannies.
- Step #4: Rinse The Kayak With Clean Water. Rinse off the soap solution with a garden hose, removing all the suds and residue.
- Step #5: Let It Dry. Allow your kayak to air dry or speed up the process with a towel or dry cloth.
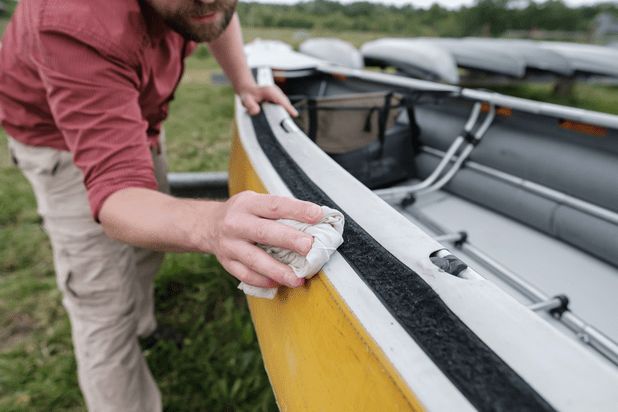
- Step #6: Wax Your Kayak Using a microfiber cloth, apply a small amount of marine-grade wax to your kayak in gentle, circular motions. Spray-on wax is also an option.
- Step #7: Allow The Wax To Dry. Leave the wax to dry, ensuring it has formed a hazy layer on your kayak's hull.
- Step #8: Polish It Off Using a clean microfiber cloth, buff the wax off in small, circular motions until the hull appears smooth and shiny.
- Step #9: Apply UV Protectant Spray Finish off by applying a layer of UV protectant spray to your kayak's hull, buffing it dry, and storing it safely.
Remember, regular kayak maintenance, including cleaning and waxing, will help extend the life of your kayak.
To summarize, using kayak wax is an excellent way to enhance your kayak's appearance and protect its hull. While waxing a kayak can be time-consuming, it's a crucial part of maintenance that will pay off in the long run. Proper care is essential to keep your kayak in top condition, especially if you plan on using it for years.
While plastic-hulled kayaks don't require waxing, cleaning and applying UV protectants are essential to maintain quality. It's mandatory to ensure your kayak stays protected.
I hope this how-to-wax-a-kayak guide has made the process easier for you and helped you prolong the lifespan of your kayak, whether it's composite or made of plastic.
Frequently Asked Questions
Is it a good idea to wax a kayak?
Kayak wax enhances the appearance of your kayak or enhances the hull's durability by adding a layer of protection. As with general kayak care and maintenance, waxing a kayak takes some time, but it's worth it in the long run.
What can I do to make my kayak shine?
Remove any dirt, debris, or mildew on the kayak's surface by washing it with soapy water. Use an automotive polish that matches the color of your plastic kayak. Make sure the hull is protected from UV rays by applying a coat of plastic gel protectant. Before using the kayak, let it dry for three days.
Does a kayak's bottom need to be waxed?
You can protect your kayak from damage by applying kayak wax. Doing so can boost the hull's durability, helping to prevent scratches and dents caused by the sun's harmful rays.
Is it possible to polish my kayak?
Keeping your kayak clean and polished periodically will prevent scratches, UV damage, acid rain damage, staining, and gel-coat cracks.
What is the best way to smooth the bottom of a kayak?
Use fine sandpaper to sand back scratched surfaces. Avoid scrubbing too much plastic off at one time. Sanding smooths the hull by removing plastic shavings. Gently heat the scratched surfaces with a heat gun or hair dryer.


